A friend recent;y asked me about DarkCoin, and I had to admit I hadn’t heard anything about it. Sure I have some bitcoins but only really to say I have them. So when he asked I just thought `ah there’s another one`. He then asked how someone would mine these things, So I showed him a few youtube videos of pretty impressive setups.
Anyway to the point, I ran through a quick demonstration of how the miner would work and setup one up on a Virtual Server (Droplet). So for anyone that’s interested here goes (p.s. I can’t say you’ll make a fortune from this method, it’s more proof of concept).
We’ll be using DigitalOcean for our server, so you’ll need an account. Signup here There’s always some promo codes for some credit at present SSDMAY10 give you an extra $10 credit. I personaly use DigitalOcean to host a few of my projects and they’re great for being able to test ideas.
Once you have your account setup, Create a new Droplet I normally use the Latest Ubuntu.
So the specs I’m testing this on are:-
Hostname : Testy
Size : 512MB, 1CPU, 20GB SSD, 1TB XFER $5pm
Region : Amsterdam 2
Image : Ubuntu 14.04 x64
SSH Key : testy (optional, you may not have added any ssh keys so you can skip this selection)
Settings : Enable VirtIO - Checked, Private Networking - Unchecked, Enable Backups - Unchecked.
Once created you will be emailed your root password (unless you selected SSH Keys).
More CPU’s would be better, but this one’s just for testing it out.
Using Putty login to your new Droplet
Now we’ll install some dependencies, and download the mining git.
apt-get update
apt-get install build-essential m4 libssl-dev libdb++-dev libboost-all-dev libminiupnpc-dev git automake libcurl4-openssl-dev screen

git clone https://github.com/ig0tik3d/darkcoin-cpuminer-1.2c.git

cd darkcoin-cpuminer-1.2c
chmod a+x autogen.sh
./autogen.sh
./configure
make
make install
cd ~
If all has gone well you can run the miner using
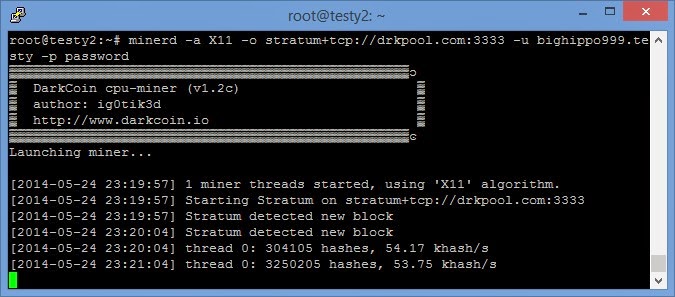
minerd -a X11 -o stratum+tcp://drkpool.com:3333 -u bighippo999.testy -p password
This should output something similar to
One thing to note, the above command will test under MY pool test login. You will not receive any coins doing this and should only be used as a test. You can stop this using CTRL+C
As long as that all seems to be ok, we should now join a pool. I’m currently using DarkCoin Official Pool I have no idea how ‘Official’ it is, but I was drawn to the graphs 🙂 I did briefly run a miner on windows using this guide and received coins directly into my wallet. Whereas using the pool I’ll have to cash anything out to my wallet and that will incur a charge. I would have also shown using the servers from the other guide, but at present they seem to be down I suppose that’s why this Pool does charge small admin % on each transaction. I can’t say I mind for good service.
Once you’ve signed up and have your details just run the miner again
e.g. minerd -a X11 -o server:port -u user.worker -p password
Replacing server:port user.worker and password with your own details.
If your concerned of your pool failing a handy script a come across
#!/bin/bash
## Miner Failover Script

## Will continously try each pool until one responds, ordered by priority.

#GLOBAL
## Set options
RETRIES="3"
SECONDS="5"
MINERD="minerd"

#POOL1
## Set userpass information for first pool
USERPASS1="name.worker:password"
URL1="stratum+tcp://lotterymining.com"

#POOL2
## Set userpass information for second pool
USERPASS2="name.worker:password"
URL2="stratum+tcp://www.drkpool.com:3333"

while :
do
$MINERD -a X11 --retries=$RETRIES --retry-pause=$SECONDS --userpass=$USERPASS1 --url=$URL1
$MINERD -a X11 --retries=$RETRIES --retry-pause=$SECONDS --userpass=$USERPASS2 --url=$URL2
done
You can copy and past this into a new document
e.g. nano -w startmining.sh
Paste the code.
CTRL+X, then Y and enter. Will exit saving the file.
Then issue
chmod +x startmining.sh
To make the file executable. Lastly it’s always better to run processes you want to keep running (but also be able to check on) in a screen.
The command
screen -d -m -S MINER minerd -a X11 -o stratum+tcp://drkpool.com:3333 -u bighippo999.testy -p password
Will start the miner in a screen, and you can view this with
screen -r
Then either disconnect with CTRL+A, then D or stop the miner using CTRL+C.
If you used the above script you can start that in a screen with
screen -d -m -S MINERPOOL ./startmining.sh
Again to view it
screen -r
Then either disconnect with CTRL+A, then D or stop the miner using CTRL+C.
EDIT:
The other pool I’m using came back online check it out here. This would be started with the following
minerd -a X11 -o http://q30.qhor.net:7903 -u Xn7JauXvQmorx82yEN2EMvbt3dX45uoiCh -p password
I hope you’ve found some of this useful, if you feel like sending me a few DarkCoins my address Xn7JauXvQmorx82yEN2EMvbt3dX45uoiCh and my BitCoin address 1DpfEhiVjNM4WZT49X18m3vXyUvGpuvz9i