NRPE compile error Cannot find ssl libraries

For years I’ve avoided SSL with NRPE because it just never seemed to work for me and on an internal network is it really needed?

I’m now doing a new fresh install of Nagios on a raspberry PI and decided after recently setting up SSL certificates on all my sites, to see if I can get this working with NRPE.

First things first, I’ve made sure the following are installed

apt-get install openssl libssl-dev build-essential

It’s also presumed you have already compiled and installed the nagios plugins and have a nagios user and group. Download and unpacked nrpe 2.13

mkdir nagios
cd nagios
wget http://prdownloads.sourceforge.net/sourceforge/nagios/nrpe-2.13.tar.gz
tar xzvf nrpe-2.13.tar.gz

Now onto the actual work:-

cd nrpe-2.13/
./configure

After a little time I got the nice error I’m used to seeing

checking for SSL libraries… configure: error: Cannot find ssl libraries

So after a little searching I hit upon libssl.so missing. Well not so much missing, it just doesn’t have a link where it’s expected. The answer to which is to create a new symlink to it

ln -s /usr/lib/arm-linux-gnueabihf/libssl.so /usr/lib/libssl.so

UPDATE: Noticed on another system it didn’t work, this was because /usr/lib/libssl.so was already present but pointing to the wrong place. This stopped the link being created. So I ran rm/usr/lib/libssl.so then reran the above, this create the link properly and the ./configure then runs as normal.

On my system it’s in the /usr/lib/arm-linux-gnueabihf folder, but on an x86 system this could be something like /usr/lib/x86_64-linux-gnu/

So now I rerun the configure step

./configure

At the point I see

*** Generating DH Parameters for SSL/TLS ***
Generating DH parameters, 512 bit long safe prime, generator 2
This is going to take a long time
…………………+…………………+…………+…………………….++*++*++*++*++*++*

I know it’s taken the SSL stuff well. When it’s complete the configure run without errors you can continue to the make stage

make all

Update /etc/services inserting “nrpe 5666/tcp # NRPE”

nano -w /etc/services

I’ve always run nrpe under xinit.d for all my installs, so make sure xinitd is installed

apt-get install xinetd

Once it’s installed you need to add a new service. edit the file /etc/xinit.d/nrpe

nano -w /etc/xinit.d/nrpe

My sample configuration:-

# default: on
# description: NRPE (Nagios Remote Plugin Executor)
service nrpe
{
flags = REUSE
socket_type = stream
port = 5666
wait = no
user = nagios
group = nagios
server = /usr/local/nagios/bin/nrpe
server_args = -c /usr/local/nagios/etc/nrpe.cfg --inetd
log_on_failure += USERID
disable = no
only_from = 127.0.0.1 192.168.0.0/16
}

You will probably need to change the user, group and only_from fields to suit your installation.
Next you’ll need a configuration. I’m just going to copy the sample for now

mkdir /usr/local/nagios/etc
cp sample-config/nrpe.cfg /usr/local/nagios/etc/nrpe.cfg
chown -R nagios:nagios /usr/local/nagios/etc/

Lastly restart the xinitd service

etc/init.d/xinetd restart

You can test your nrpe installation from your nagios server with the check_nrpe command. It’s probably worth also checking the syslog or messages for the system after restarting xinitd as any errors regarding startup will be reported.
I’ve tested from my server using

/usr/local/nagios/libexec/check_nrpe -H titan

titan being the name of the server I have just complete an installation of plugins+nrpe on (I’ve already run through the above on titan itself). It responds with

NRPE v2.13

So all working.

UPDATE #2
I skipped through the steps above and was trying to just return the NRPE version, I kept hitting the error: “CHECK_NRPE: Error – Could not complete SSL handshake.”
Thinking something was wrong with the SSL I went back through everything, but same error. I then realised I hadn’t yet put a config in place for NRPE (as I was only trying to return the version number didn’t think it was too important) a silly mistake, but returns an off putting error.

mysql not in returning blank rows

ok a bit of a weird one I’ve hit twice in the last week. First time I solved it by changing the query around (so I thought, but it’s more likely I updated the data).

This is a query that’s being run:-

select `option_id`, '' as `image`, '99' as `sort_order`, `Subproduct Code` from CSV, oc_option where `Product Code` = `main_jan` and `Subproduct Code` not in (select `jan` from oc_option_value) group by `Product Code`

Basically it has to insert values into a table where they don’t already exist, pulling values from 2 other tables.

The problem I was encountering is that data wasn’t being insert, the table only had 2 records so it should have been inserting over 500 additional rows.
Running:-

(select `jan` from oc_option_value)

returned the 2 rows, and running:-

select `option_id`, '' as `image`, '99' as `sort_order`, `Subproduct Code` from CSV, oc_option where `Product Code` = `main_jan`

returned over 500, so why wont it work together.

Well I finally stumbled upon someone making a passing remark about a not lookup selecting nulls. Looking at my results the 2 entries that were already there were in fact nulls, so I added

where `jan` is not null making the whole statement:-

select `option_id`, '' as `image`, '99' as `sort_order`, `Subproduct Code` from CSV, oc_option where `Product Code` = `main_jan` and `Subproduct Code` not in (select `jan` from oc_option_value where `jan` is not null) group by `Product Code`

And it’s now all working.

Nagios Plugins fail to Compile

Getting the error

check_http.c:150:12: warning: ignoring return value of âasprintfâ, declared with attribute warn_unused_result [-Wunused-result]

When trying to compile the nagios plugins 1.4.16 in Ubuntu 12.04, it comes down to SSL.
Running : apt-get install libssl-dev
Then ./configure and make again fixed the problem.

As a side note I was also having problems with NRPE not installing. This one was down to not reading the error. the user and group nagios doesn’t get created by the nrpe install script. So just have to add the user and group and then the install was fine.

Ubuntu 12.04 Decrypt Drive Remotely

It’s been a while since I setup a new system, and although I had to look into decrypting a drive remotely a few months back when one of my servers refused the key, it’s pretty much been just as long since I really had to setup remote decryption from scratch.

Tonight I’m building up a new system to replace an existing server. The reason is it’s undergone several major distribution updates without a full reinstall and I think it starts getting messy after a while. Put that together with X refusing to startup and display my cctv stuff after updates a few months back (see other post), I really think it’s time for a clean server.

I’m not going to run through all the step for my install here, it’s pretty common Ubuntu 12.04 Alternative CD, Encrypted root, swap and data running on LVM and a /boot that’s the first partition on the disk.

Now I’ve got my system up and running, I want to be able to remotely access it while it’s booting to provide the decryption key and then let it continue. I do this on all my system, and although I’m sure you don’t need all the commands when it’s booting I use them just to be sure.

I’m making the following assumptions, you will need to adjust accordingly:-
Your machine is already on your network.
You have SSH access to your machine.
You have root privileges.

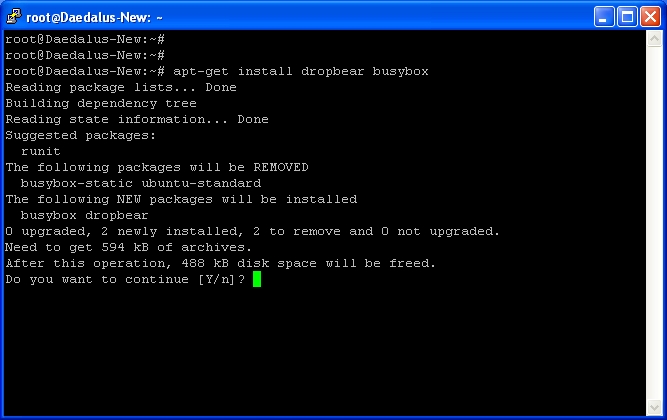
First thing is to install dropbear and busybox

apt-get install dropbear busybox
It says above it’s going to remove busybox-static and ubuntu-standard, I personally dont have any issues with this, but you may wish to search google for what these packages do (or any packages your system says it’s removing) before you continue.

At this point I reboot my system (you wont have any remote access yet), purely because I’d already run updates and forgotten to reboot before I started this blog.

When the system was rebooting, pressing escape when being prompted for the decryption password showed me the interface configuration.
I was able to make an SSH connection to the dropbear server, but unable to authenticate. Also as this was a DHCP ip address, it’s not really much good as a remote recovery system.

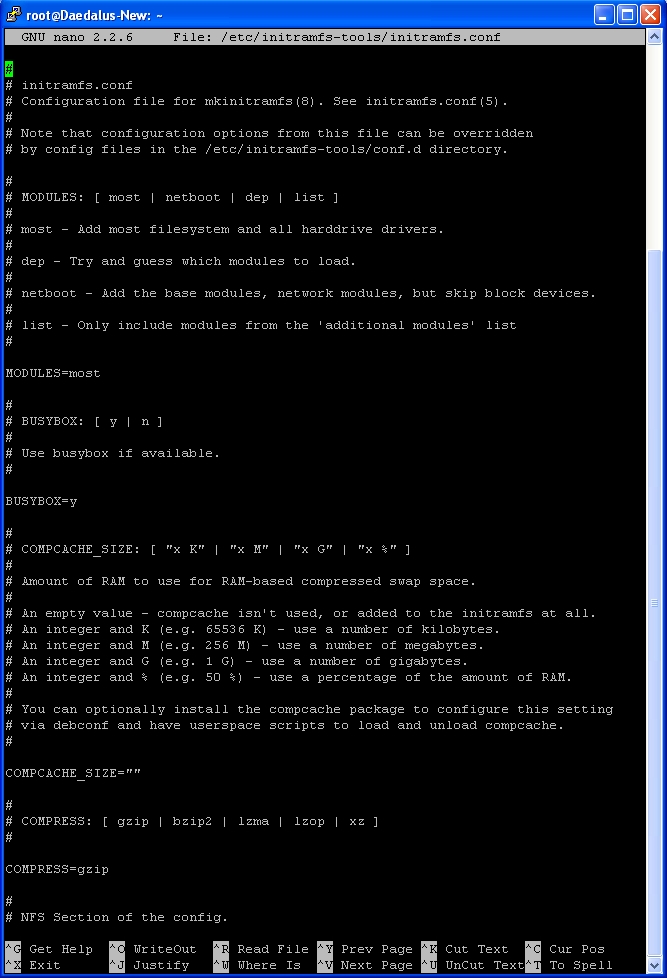
Next we need to edit initramfs.conf
nano -w /etc/initramfs-tools/initramfs.conf
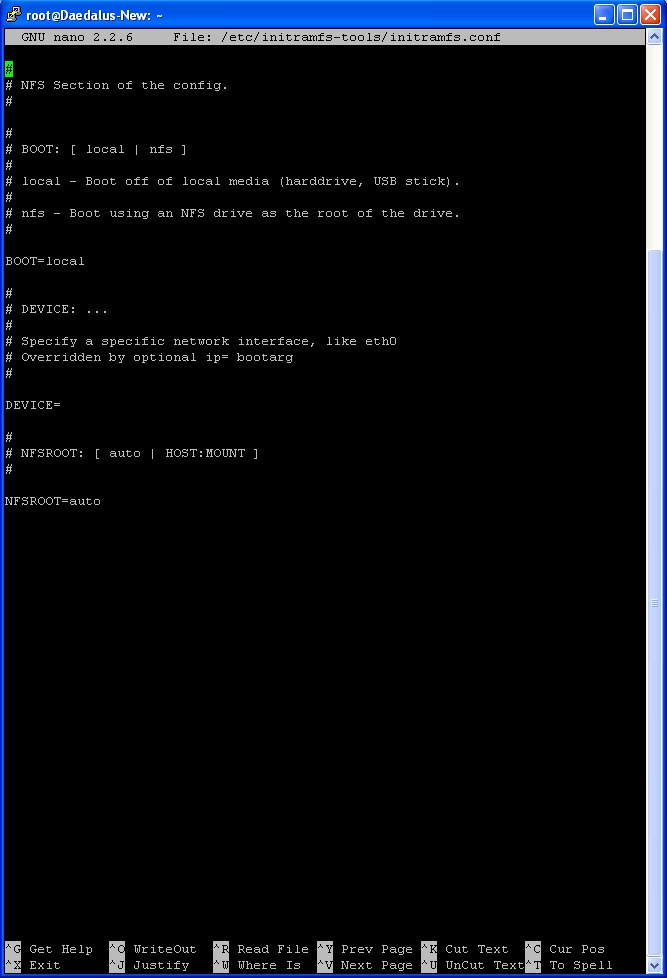
Here’s how my file looks before editing:-

Locate the line DEVICE=
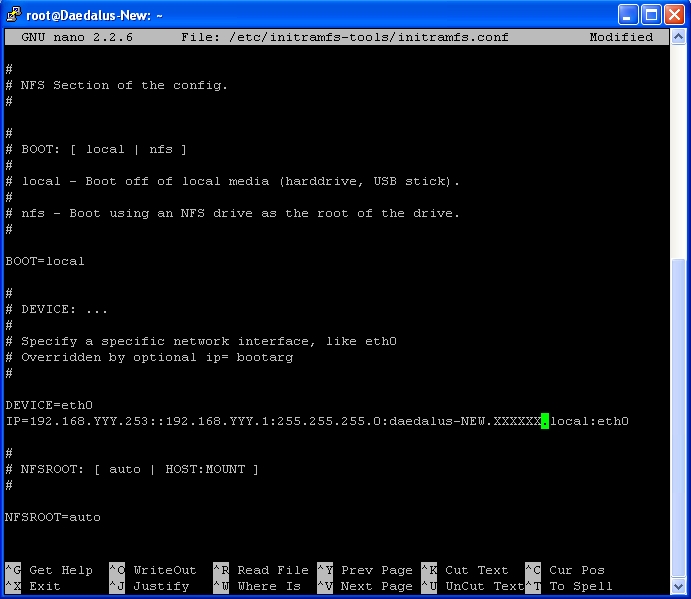
and adjust to be DEVICE=eth0
then add a line IP=192.168.yyy.253::192.168.yyy.1:255.255.255.0:daedalus.xxxxxxxxxx.local:eth0

Replacing the yyy with your own network value and xxxxxxx with your own domain
The IP= is separated into the following options IP ADDRESS :: GATEWAY : SUBNET : COMPUTERNAME : INTERFACE
There’s an option between IP and GATEWAY, {review} I need to add in explanation for but wont affect anything left empty.

Personally I use the address .253 as it’s outside my DHCP scope and not an address I’m using. I also have it setup on my router to forward SSH traffic to the .253 IP. Once the machine has boot it drops the .253 address so is only accessible externally while booting.

Save and Exit this file. CTRL+X. Followed by Y to save. Then ENTER to keep the same name.

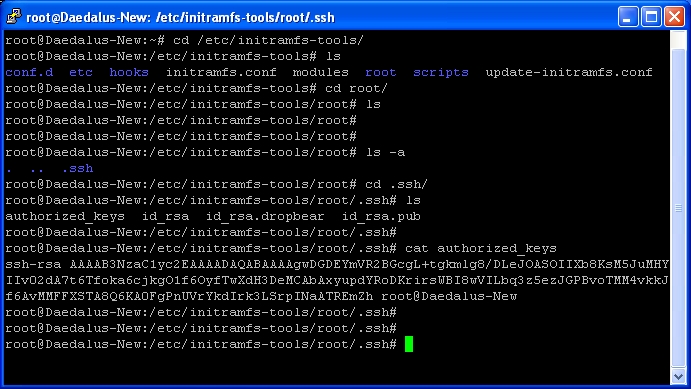
Now we’re going to add an authorized key. First
cd /etc/initramfs-tools/root/.ssh
then
cat authorized_keys

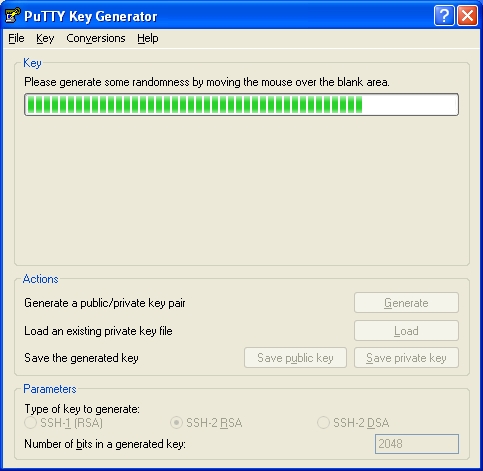
As you can see it already has an entry from the dropbear installation. However we’re going to replace this with a new key. First we must generate the key. On your windows machine open PuttyGen from your start menu:-

Press the Generate button (I increased the bits to 2048 first).

You will be asked to move the mouse randomly over the blank area until the green bar completes.
Then a key is generated:-

Once your key generation has complete, save the public key. How you choose to secure this is upto you, personally I just keep it saved in my documents, it’s not decrypting the hard drive just getting me access to do so.
With that saved right click the public key and Select All, then Copy.

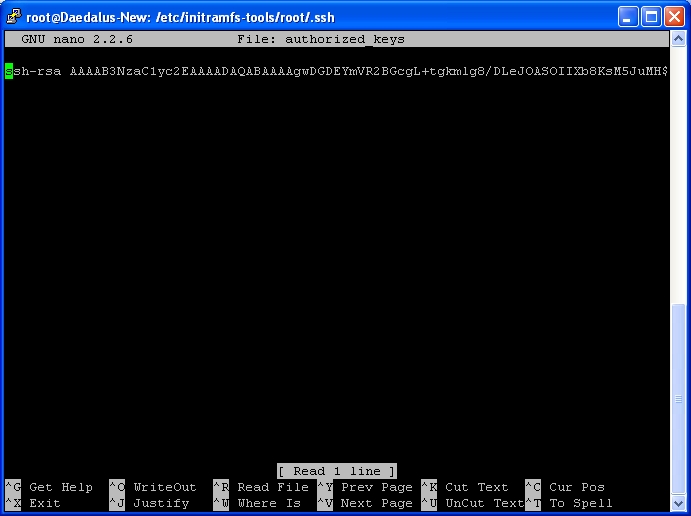
Now go back to your Putty SSH connection window and nano -w authorized_keys

As you can see the existing key is already in place. You can delete this line entire if you wish CTRL+K. If you didn’t delete just move to the next line. Once on a free line simply right click to Paste.

As you can see Nano has scrolled to the end of my line, so I can only see the Key comment. You can now Save and Exit this file. CTRL+X. Followed by Y to save. Then ENTER to keep the same name.

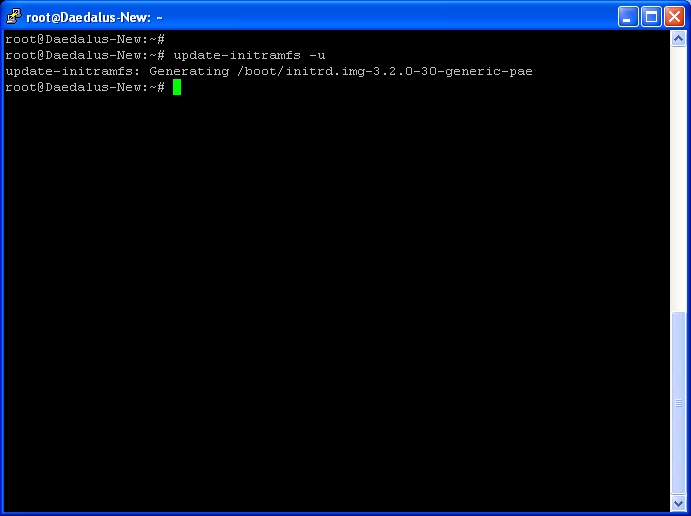
Now that we’ve made adjustments to the boot configuration you need to rebuild the boot files.

Type update-initramfs -u
UPDATE:- you may encounter the error “cp: cannot stat `/lib/x86_64-linux-gnu/libnss_*’: No such file or directory” I cover this in another post http://blog.starbyte.co.uk/cp-cannot-stat-liblibnss_-no-such-file-or-directory/
Once complete you can reboot your system ready to test.
When you system is rebooting and sat prompting for the password, press the Esc key and ensure that the network configuration is correct.

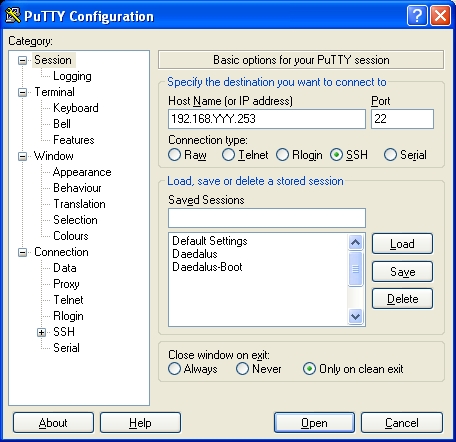
Now we need to connect to the system from our windows machine. Open Putty and start a new connection:-

Click on Data on the left hand side:-

Fill in the Auto-login username as ‘root’. Then expand SSH and select Auth:-

Browse to the private key you saved earlier.
You can either press Open to connect now, or return to the Session screen and Save the session for easy access later (I didn’t).
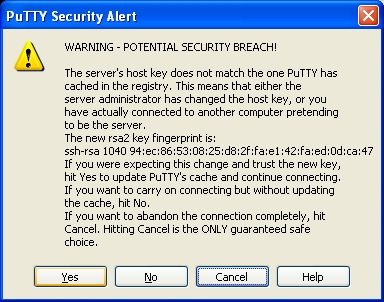
Once connecting you should be prompted to accept the fingerprint:-

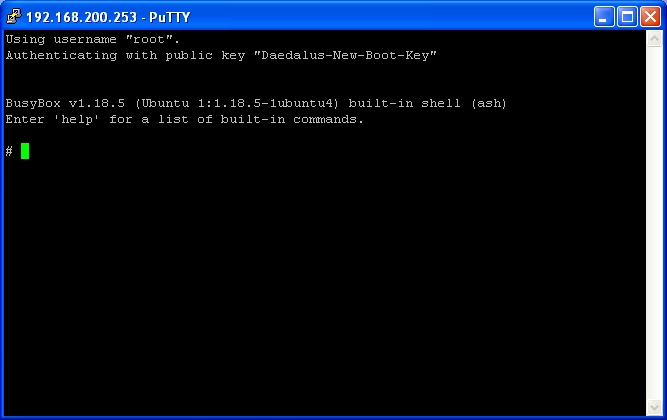
You should now be connected to your server:-

You may wish to use the above to create new keys from each machine you may connect from (Desktop, Leptop, etc) and append them to the authorized_keys file. If one of your systems is then lost you can merely remove the key and regenerate the initramfs.

Now that we have our connection, we need to supply the password. Over the last few years I’ve come across various different methods. Some pipping the password into a hook, others killing the script currently asking for the password and manually unlocking the drive. The later method is the one I’ve always used, mainly because I have multiple encrypted drives and unlock each of them manually.
{sidenote: rebooting from within busybox did restart the machine, but left it on the grub selection screen no countdown. Encountered a halted boot before but didn’t know why. Need to ensure grub always has default countdown}

I’ve just run through a few quick tests of simply pipping the password and it still doesn’t work for me. So here goes with the 2nd longer process. I’d like to thank whoever I originally found this from, but I have no idea. Their steps were extremely well written (unlike mine).

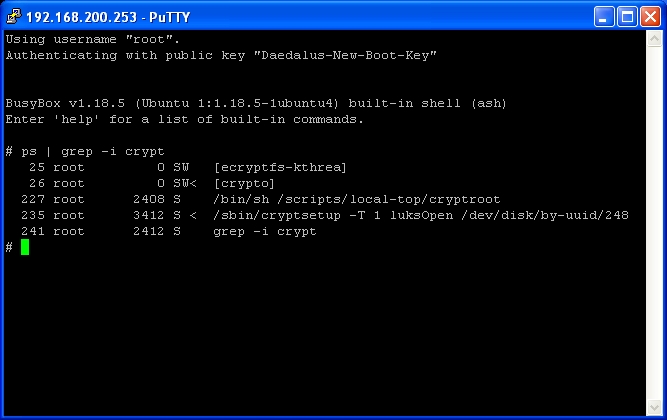
First we need to stop the current script running looking for the password:-

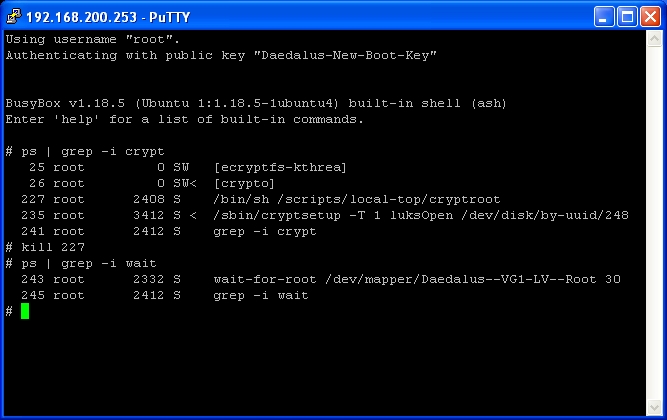
Type ps | grep -i crypt
This will list the running crypt processes. We’re interested in the script in local-top. It’s process number is 227, so we issue : kill 227

Now that we’ve issued the kill, we need to wait a while for the system to drop to a prompt. Type ps | grep -i wait
As above you will see the wait-for-root script running, and it has a value of 30 (meaning 30 seconds). If you wait 30 seconds and rerun ps | grep -i wait, you will find it’s no longer running.
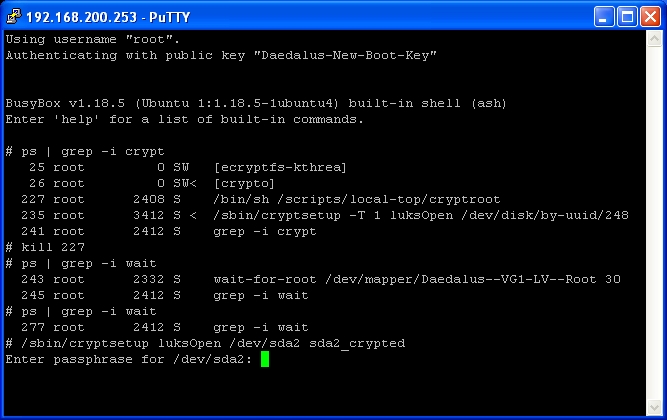
You can now continue to unlock your drive(s)

In the image above you can see where wait-for-root was running, then the following check it wasn’t. Followed by the command I use to unlock my drive.
Type /sbin/cryptsetup luksOpen /dev/zzzz zzzz_crypted
Replacing the zzzz with your drive and partition. If your unsure you can always double tab for suggestions.
You wont get any password feedback, so if you think you’ve made a mistake hold the backspace key for a while then type again.
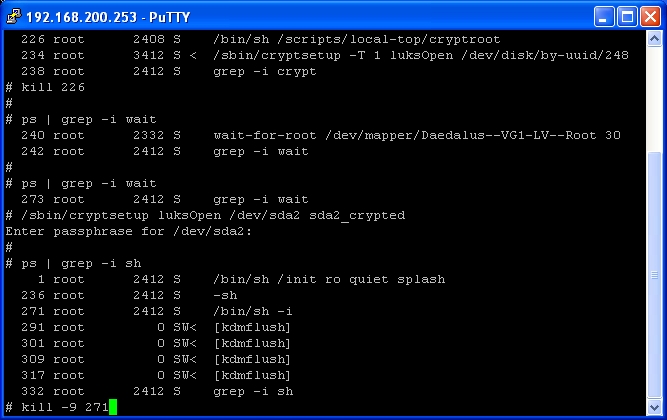
If your password is accepted you will be returned to a prompt.
At this stage we tell the shell to kill itself:-

Use ps | grep -i sh to find the process number (271in the above) then kill -9 271
Follow by exit
If all has gone well I normally receive:-

Normally if I haven;t received this, I’ve done something wrong. At which point physical access is required to correct my mistake (or get someone to reset the machine and try again).

At some point I may make a script or 2 to run and see if it hasn’t been unlocked within 30 mins to reset. This may give me a bit of resilience is screwing it up. After a few times of unlocking though you really do remember the commands. I did save a text file into the root folder /etc/initramfs/root/guide.txt
(Thinking of that now I’ll just paste that below – again thanks to whoever originally wrote it. but after a few times I didn’t need it anymore.)

1) run “ps aux” and located the process id for the /scripts/local-top/cryptroot script
2) run “kill -9 pid” replacing pid with the process id you found in step 1
3) run “ps aux” again and look for a wait-for-root script and note the timeout on the command line
4) twiddle you thumbs for that many seconds – what will happen is that script will exit and start an initramfs shell
5) run “/scripts/local-top/cryptroot” and wait for it to prompt for your unlock passphrase
6) enter the unlock passphrase and wait for it to return you to the busybox shell prompt
6.5) Unlock each drive to get a clean boot, sda,sdb,sdc,sdd as sda_crypt,sdb_crypt,sdc_crypt,sdd_crypt
7) run “ps aux” again and locate the process id of “/bin/sh -i”
8) run “kill -9 pid” using the process id you found from step 7

As you can see I added 6.5 to remind me to decrypt other drives. Doing this means their mounted as the system is coming up.
That’s pretty much it. You should now be able to remotely unlock your encrypted drives.I realised towards the end my internal IP is on the top of the putty windows, but I only really masked it from the examples to highlight a change. I hope people find this somewhat helpful. Any feedback welcome, I’m now off to start copying data over. and btw I’ve changed the keys incase anyone worries for me 🙂

UPDATE:-
I’m just running through this on 12.10 and ran into a problem whereby the ip address yyy.253 wasn’t being released. Some searching suggested that network/interfaces will be ignored because of checks in the process that fail. This wasn;t the case for me, I was getting 2 addresses on the interface. The solution was to add:-

pre-up ip addr flush dev eth0

To /etc/network/interface to clear eth0 before applying the new IP.

Logwatch pam_unix unmattched entries

Ok this post will need some work to pad it out and make more sense.
I’ve been running logwatch for years and a few months back had to reconfigure some of the configuration files after splitting out syslog to multiple files to make them easier to read i.e. putting all cron stuff into cron.log bind9 into named.log etc.
After those simple changes my logwatch email went from a hundred or so lines to thousands and until now I haven’t had time to look into it.
All the unmattched entries were against the cron log and all being pam_unix stuff as cron goes off running stuff.

As I didn’t get these before I was a bit confused but looking around at the configs and services there is a pam_unix.conf in the services. So after more changing and fiddling about I was still getting over 7k lines of logwatch email and no idea why. but tonight on looking closer at the email it’s the cron service that’s marking the entries as unmattched not as I thought that pam_unix wasn’t going near the file (to be fair it probably isn’t, but that’s not why the lines are being included in the email).

I wont run through my entire process of narrowing it down, to be fair I couldn’t remember every step I’ve done tonight anyway. Bottom line was modifying the following:-

/usr/share/logwatch/scripts/services/cron

find the lines:

} elsif ($ThisLine =~ /FAILED to authorize user with PAM (User not known to the underlying authentication m$
      $PAMAUTHErr++;

underneath insert the lines:-

} elsif ($ThisLine =~ /pam_unix/) {
      $PAMUNIXAUTHErr++

then search for:-

if ($PAMAUTHErr) {
      printf "nPAM autentification error: " . $PAMAUTHErr . " time(s)n";
}

and underneath insert the lines:-

if ($PAMUNIXAUTHErr) {
      printf "nPAM_UNIX autentification error: " . $PAMUNIXAUTHErr . " time(s)n";
}

Save the file, and that’s it.
Now instead of having 7k extra lines of pam_unix stuff, I have one line summing up.

As a side problem, I’m now receiving clamav info when I wasn’t before and dont run clamav or have the logfiles mentioned. that’s something to look at tomorrow, but at least the logwatch is back down to one small scrollable window so even with the clamav annoying stuff I’m happy to be able to read the logwatch out easily again.

As the top says this needs some cleaning up on edit. hopefully get around to it in the next few days.

Ubuntu Graphics Problems

I ran into this problem a while back on my server but it’s never really affected me as I dont generally use the console.

After running updates a good few months back, my system stopped giving me any output. It wouldn’t load to X or a console and even stopped showing the splash screen and the boot info.

The way I was getting around it was to just use an earlier Kernel version during boot. But tonight while doing some work this little bugger got me again.

After hours working through numerous problems I’ve just left unresolved this one finally needed to be solved. Previously I’d just SSH’d to the machine having no console, started the xlib_shm stuff and up popped the CCTV view and I’d just leave that running, but tonight even that wouldn’t work.

I found the following info while trawling the interweb for fixes:-
The problem seems to start after Kernel 2.6.38-8 (that’s the last one I can boot without problems)
It’s related to the ATI graphics card and drivers
*ERROR* Failed to register bit i2c VGA_DDC was showing up in the syslog

I found info in several bugs saying to add this ‘i2c_algo_bit.bit_test=0’ but didn’t actually say where.
https://bugzilla.novell.com/show_bug.cgi?id=691052
http://lists.freedesktop.org/archives/dri-devel/2011-June/012061.html
http://forums.opensuse.org/english/get-technical-help-here/install-boot-login/459015-no-display-after-online-update-4.html

So I opted to add ‘i2c_algo_bit.bit_test=0’ into the grub config for the lastest kernel, so my grub line now looks like ‘linux   /vmlinuz-2.6.38-15-generic root=/dev/mapper/VG-LV_Root ro   quiet splash i2c-algo-bit.bit_test=0 vt.handoff=7’

Rebooting kept my splashscreen, and presented me with my console once again. and now my xlib_shm was also working once again.

But as I’m very likely to forget after a bunch more remote updates, I thought it best to make it a little more permanent, so I edited /etc/default/grub and amended the OPTIONS line to read ‘GRUB_CMDLINE_LINUX_DEFAULT=”quiet splash i2c-algo-bit.bit_test=0″‘
a quick run of update-grub and my entire config is updated.
This should survive future updates and keep me with a working console should I need it.

cp: cannot stat `/lib/libnss_*’: No such file or directory

Another Quick note as I keep running into this and every time go hunting for what I did to fix it last time.

When doing update/upgrades I run into the error cp: cannot stat `/lib/libnss_*’: No such file or directory when it’s running update-initramfs

This seems to be because of the dropbear hooks, that I use to decrypt a filesystem remotely.

https://bugs.launchpad.net/ubuntu/+source/dropbear/+bug/834174

Has all the info, but the basic steps for me are:-

nano -w /usr/share/initramfs-tools/hooks/dropbear

search for the line

cp /lib/libnss_* "${DESTDIR}/lib/"
Add x86_64-linux-gnu into the path making the line

cp /lib/x86_64-linux-gnu/libnss_* "${DESTDIR}/lib/"

UPDATE: This is valid for a 64bit system. For a 32bit system the path is more likely to be /lib/i386-linux-gnu/
This would make the line

cp /lib/i386-linux-gnu/libnss_* "${DESTDIR}/lib/"

Then run

update-initramfs -u

and no error.

Asterisk SIP One way Audio

ok, I know what your all thinking just from the title alone.
It’s SIP and One way Audio, it’s going to be a NAT and firewall issue. That was my immediate thought too, but it’s wrong.
To explain a little of the background will probably help.

I’ve been running Asterisk at home now for years, using a Digium 422. One line coming in, and a few Linksys SIP phones.
I’ve been happy with it running away for some time, adding in blacklist functions into the dial plan of incoming calls, blocking withheld numbers into entering their number and building up a list of numbers that are annoying me to reject. I’ve had a few people questioning when they’ve called about it. and even more from visitors whose witnessed the Tivo auto pausing if a call comes in as well as displaying who it is.

So after years of me singing it’s praises (as well as a linux server in general), it’s no-wonder that someone else wanted me to do a similar setup. Enter cousin 🙂

After weeks of searching on ebay, finally someone is selling a digium card. So bought it up quickly.

He’s had a Linux server running for a good few months, and I’ve got it all VPN’d together with my network.
So I installed the Digium card, installed asterisk, and went about configuring it using my config as the basis.
It all worked well, incoming and outgoing calls all fine using the card 2 phones connected and one line.
But obviously, now you’ve got a little you want more. So off he went looking at phones, I have to be fair he found a great deal of linksys phones, 4 of them with power for £40 when most are selling single units at over £20.

So I spend another few hours running network cables to 4 different locations in the house, connect up the phones and go back to configuring asterisk and the phones. Fairly straight forward, run through testing phone to phone etc, all appeared fine.

The following day I had a lovely call saying that their now getting one way audio. Straight away I thought that’s NAT, but as all the phones and asterisk box are on the inside NAT shouldn’t come into it. Still I went back through the SIP config and adjusted lots of it to completely wipe out NAT (I use NAT in my config as I have some connections from SIP providers etc).
More testing, but still the same.
So I started running SIP and RTP traces, I’ve had to read through them bother before and can just about follow what’s going on, but I mainly just look for anything obvious out of place, like IP addresses that are external etc.
Still after going through them, it all looked good in the SIP debug, but the RTP was only showing one side audio on calls that were going in / out over the Line. Calls to other phones were fine.
So I registered one of the phones onto my system and placed a call, that worked fine.
So I come home and registered one of my phones to his system. Placed the call, and again one way audio.

I’m not convinced it’s a NAT problem as my phone would now be running over the VPN to his server and it’s the same server that terminates the VPN. I now started checking out the codecs, but testing using different ones just pointed to it not being codecs. If it couldn’t find common ground the call failed from the start.

It took a few days to get back to as I was onto other stuff, but check after check just showed that everything was fine. But still the one way audio on calls.

I looked again and there was a new version of asterisk released 10.1.3, where I was using 10.1.2 on his server. The 2 fixes in the change were around SIP. So I downloaded the new version, compiled it and installed. Made sure it was all running and then got home to make some test calls.

Still one way audio. So I’m now left with one option. My own server is running an older version of asterisk 1.8.6.0, I uninstalled his asterisk completely and then downloaded the source for 1.8.6.0, compiled and then installed.
Using the same config from the 10.1.3 install threw a few warnings on loading, but it still loaded. Got him to make a test call, he called my mobile and hey presto we can hear each other.

I wanted to update my own asterisk, but after encountering this issue and especially as it’s still present in the latest I think I’ll leave updating my system for a while.

Bottom line, dont just consider One way Audio a NAT problem, and if everything looks to be working correct consider downgrading if there’s no upgrade available.

Raspberry PI

After waiting all of Feb for news of when the Raspberry PI was going to be released, We finally got told that an announcement would be made at 6am on Wednesday 29th.
As I was still awake at 3am, I thought no point in setting the alarm I’ll just stay awake. Hoping that this would indeed be the launch day.
(As it was very early in the morning and I’ve definitely slept since the following times are approx.)
Sometime after 5am raspberrypi.com was replaced with a down for maintenance page.
Then about 5:45am, raspberrypi.org seemed to disappear off the net, then come back with a nice server error. but this only lasted a few mins.
As the time got closer to 6am, I could feel the pain of the PI’s servers. As I had at least 10 mins to go, I wasn’t hitting refresh 60 times per min (I’m sure enough people were). Every now and again the server wouldn’t respond, so I’d gave it 30 secs and try again.

All of a sudden (I’d say at about 5:58am), the raspberrypi.org page loaded up and was completely different. This is it the announcement we’re all waiting for.
As I scanned through quickly, I noticed them saying about licensing 2 resellers I kept looking quickly for the ‘where to buy’, then I got it 2 links. So I quickly right clicked on each and opened in a new tab.

Both loaded fairly quickly. Once into the Farnell site I searched raspberry, as the results come back it said 2 products but didn’t show them. So I click on the words products and it reloaded and displayed. Clicking the add to cart option threw up a nice little dialogue under the cart saying adding, then that was replaced with an ‘unable to find price in database. Item not added to cart’ error.
SHIT!! was the exact thought, never mind try the 2nd obviously farnell has an issue.
As I got to the RS site again there wasn’t anything on the homepage like I’d expect for a pretty big launch. So again type raspberry into the search and hit enter. It comes straight back with a specific RaspberryPI page. I scrolled quickly down looking for the add to cart button or buy button, but nothing only a form to fill out with my details to register my interest.
‘Surely that’s not right, I’m on the wrong page.’ I thought. Again type raspberry into the search box and back I come to the same page. Bugger it, as least I found it on the farnell site so I went back to that tab. reloaded the page and searched again, expanded the products and clicked the add to cart button. Again I got the nice error!! I’m seriously not impressed now, I’ve hit both sites very early on but not getting me any closer to having a nice order number.
Back I went to the RS site and thought well I’ll fill in the details and maybe it’ll direct me then to another page. Filled them all in and submit. Great but still no page where I can order it. So decided to go back to the start page for RS and look at the categories incase it’s not coming up on a search. It was at this point that the RS site started to load slowly for me. So back I jump to farnell, and refreshed back to the homepage.
Now the fun begins, Farnell just completely stopped loading anything for me. give it a couple of secs and refresh, oh I’m pushed to a page telling me their site is overloaded but I can phone an order through.
Great stick the number into my mobile and press dial. Nope it didn’t dial, instead I’m being sent to a page. Thinking to myself wtf, as the page sprung up with a list of alternative numbers, I quickly realised I installed No to 08 app ages ago (I dont ring 08 numbers very often and forgot I did it). Never mind though it’s given me an alternative so clicked it and dial commences. Ring-Ring, and I’m answered. Oh NO it’s an IVR happily telling me their lines open at 8am but I can place and order or enquiry at their website. Not F###ing likely I thought while hanging up.
Refreshed Farnell, dead. back I go to RS. It’s loading but the search is still giving me the same register my interest page.

All this has taken place within about 5-10 mins.

So thinking quite calmly, ‘Maybe they haven’t released yet, I should really read through the raspberry announcement page’. So back to that tab and scrolled to the top. This time paying attention, I take in all the info and yep they are on sale from today.
Back to Farnell tab and refresh = nothing.
Over to the RS tab and refresh = oooohh it’s slow, and now it’s gone.
After about 5-10 mins of jumping back and forth between tabs, and I have to admit I’d also opened additional tabs since I’d been refreshing the Product Search on Farnell, I’d opened a new one for their front page. and similar on the RS.
As I’m getting nowhere fast, I went back to the RPI page. Then noticed they’re twitter link. So I opened this (in a new tab).
oh there’s lots of people shouting on here that they can’t get anywhere. All of a sudden I noticed a posting from Liz saying if your getting the register your info page on RS your on the wrong page.
‘F#ck It!!’ I thought, back to the RS tabs and refresh, luckily the one did load and did another search still it took me back to the register interest page. Another search gave no results.
Back to Twitter I go, in the 20 or so seconds I’d been away twitter was very happy to tell me 80+ new posts.
Now I have to admit, I’ve gone through product launches from a tech side and it’s always worse than what the marketing people tell ya. I knew that the R-PI was going to be big and that the first 10,000 was going to sell out fast. I’d only judged that on the number of downloads that the (pre) software image had a few weeks back and the number of people talking in the forums. Having never looked at the number of followers the R-PI had on twitter, I didn’t expect the overwhelming chatter I now threw myself into.
I’m not a big fan of twitter personally, it just doesn’t appeal or click with me. But at 6:30 in the morning I have to say I was enjoying managing to read 2/3 comments before it was popping up another 10+ new comments, clicking that reading a few and repeating.
While doing this jumping to other tabs and trying to refresh, unlike early though where the pages did load but slowly, I was now hit with no response across all the Farnell & RS refreshes.

After another 20 mins of reading tweets and trying to refresh pages, I had a call from my cousin did I want to go for coffee and he’s now on the way home.
‘Yep, fine’, not getting anywhere with this now. 2 sites down, lots of angry tweets, and my hopes of getting a R-PI early was pretty much wiped out.

After an eventful trip to the coffee place, which consisted of the coffee girl in tears because a boss she doesn’t like is coming back to the store and she now has to transfer stores.
We’re back in the car, oh the times 7:59am. Well their lines open at 8am, I doubt very much that they’ll have any left now, but don’t ask don’t get so I pressed redial on my phone. It rang and rang then an announcement ‘higher call volumes than expect, please hold’, at least their open. Then I get a nice double beep off my phone 8% battery remaining.

Now I’ve been in much worse positions with little battery life, but the timing just sucks. never mind I’ll keep on the line until the battery is dead. Now I have to say a big thumbs up to HTC, every other phone I’ve had has pretty much died within seconds of telling me it’s low when on a call, but this one managed a 10 min journey home while still on the call (in a queue I should add), and my 5 mins fumbling around single handed trying to find my keys, while not dropping either my phone or tablet.
Alas after 15 mins of holding, I decided there’s little point in holding, if they had any left at 8am, 15 mins worth of calls would definitely wiped them out. So I hung up.
Went back to my laptop and refreshed. Both pages still out, so back to twitter I go.

Plenty more chatter to catch up on, but still there’s one hell of a constant flow of new stuff coming through.
All of a sudden a refresh of Farnell kicked in. It was my search one, so I quickly clicked add to cart. oh it’s added!!!!!
Checkout!! – it’s only gone straight through and given me the checkout.
So in I filled the address info, and proceed. it’s trying to load an invoice page but nope timed out. I can see in the addressbar I have a session ID, so maybe just maybe it will remember me if I refresh and it wont kick me back to the start.
5 refreshes later and I have an invoice page loaded. Quickly filled in my details and onto the next page.
All in all it took me about 5 mins to get all the way through and a hell of a lot of refreshes along the process. but finally it’s complete my order.

I received an email confirmed my new account, a few hours later I had some mails confirming my order and giving an estimated delivery of end of march (I’d be quite happy with that I thought).

Today I received another confirmation of my order, but now pushing estimated delivery back to the end of April. I’m kind of expecting that to get further back as time progresses, but we’ll see what happens.

This evening I received a mail from RS confirming my interest and saying they will be mailing out to take orders later in the week. They also put that the orders will be sent out in a first come first served.
Now I’m not entirely sure if they mean the register your interest order, or a new order starting with another gold rush when they mail people saying you can buy them from them.
If it’s the former, I’m hopeful that my submission for interest was early enough to be amongst the first while everyone else was still looking to buy it. It was after all done while they’re site was quite alive.

Time will tell. I’m still really excited with all this, and think that the enormous following it’s gathered has to be a good thing. I’ve got so many little projects that I want to do with it, if I could get a few by the summer-time it would definitely keep me busy all summer.

Ajax woes

<updated see bottom>

Well it’s been a while since my last post, I’ve been working on a website that’s been taking up alot of my time and giving me a big headache.
Basically I started with a one page template that had a nice clean look. Unfortunately since I was last working on webpages, CSS has sprung up and taken over. So for every little change I had to copy an existing bit of code then change it, then refer to the CSS file and after alot of playing and going back and forth I finally got the template file looking how I needed it to to progress.

Now that I have my template page, I took that and created a few basic pages. To get the pages a bit more functional I changed the pages over to PHP. This worked well and now I had a whole login/register system, some basic pages displaying info, and some pages that interacted with a database.

All this was starting to come together and look good.
Things are never supposed to run smoothly though are they. The more I used the pages the more I thought that they need to load more smoothly, rather than going to a new page request for everything I needed to start using ajax.

So instead of finishing off the site as I was going, I decided to rewrite what I already had done to fit into an ajax framework.
Changing each of the tabs to pull the relevant page into the existing page was pretty simple. I got the tabs all working, highlighting the correct tab and changing along the way perfect.
Now the tricky bit, alot of the pages use forms and scripts. So I decided to try tackling the scripts first.
Basically I dont want to load all the script on the first load of the page as it’ll load up a lot of scripts that wont even be used. So I put the script in the page that gets pulled by ajax. seems like a simple solution.
However if the script isn’t present on page load the script isn’t recognised. ok I’ll stick the scripts to one side and work on the forms. oh no a problem, to use the forms inside ajax it needs a script to run.
So I fell back and decided just stick the script in the head of the first file at least it’ll get it all working. Nope that didn’t work either. As the elements aren’t present on the page when the script is first loaded the submit intercept stuff isn’t getting applied.

So I’ve started looking for a way to put scripts into ajax pages that will be relevant scripts for that page. I think this would be pretty common, but after hours of looking there is stuff out there mentioning it, but nothing explicitly saying how to have an initial script running to interpret other scripts inside an ajax page.

So there’s my ramblings for the night and the reason’s I stopped posting stuff for a few weeks. I don’t want to post details about the site just yet as it’s a complete work in progress, I have alot of the backend working but the entire site is currently ripped apart and non-functional. I know all the bits I want to get it to do, just not quite how to do them. I’ll solve it eventually, you’d have thought from the years working within IT I’d have loads of development contacts, unfortunately I have quite a few web designers, but none that do php/code development.

<update>
ok so after alot of searching around I found alot of stuff saying anything in a script should get interpreted as it’s loaded but that wasn’t happening for me. more and more searching I found a different way of loading the content instead of the httpxml or xmlhttp whatever it was, the following works for me:-

function loadajax(page,tab)
{
var page,tab;
$.ajax (
{
method: "get",
url: page,
dataType: "html",
success: function( strHTML ) {
$( "#content" ).html( strHTML );
}
}
);
}
</script>

Hey presto as the page gets loaded the script inside is now run too. Now to rework all the forms and stuff on the site.
<thought>I really do need to look at how you put script on a blog properly too.</thought>