Nagios Twitter Alerts

I’ve had nagios running for years, so decided to play around with the alerts.
Twitter seemed the obvious choice, it’s easy for a people to follow the twitter account that’s publishing the alerts, and great if you actively use twitter (I don’t, this was more of a ‘how would you’ rather than a need).
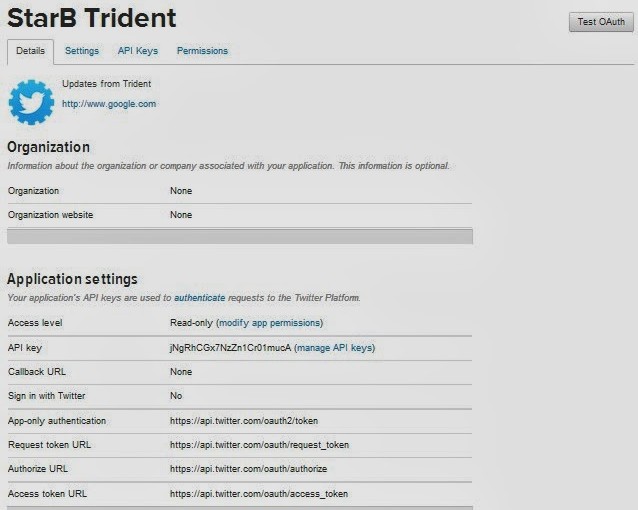
First thing is to register a twitter account that nagios will publish as. I setup https://twitter.com/NagiosStarB
Once you’ve registered you need to edit your profile and add a mobile phone number (This is needed before you can change the app permissions later. Once you’ve done that you can delete the mobile number).
Now head over to https://apps.twitter.com/ and create a new app
Fill in Name, Description and Website (This isn’t particularly important, as we’re not pushing this app out to users).
You’ll be taken straight into the new app (if not simply click on it).

We need to change the Access Level, Click on ‘modify app permissions’

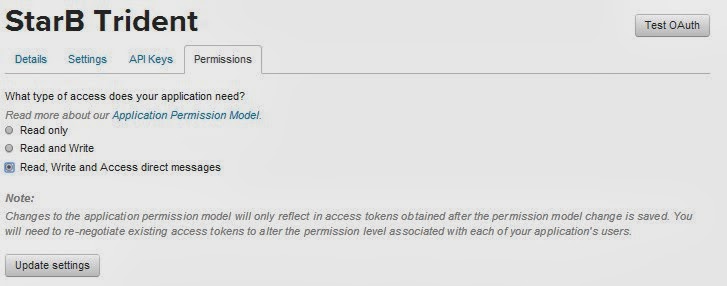
I chose ‘Read, Write and Access direct messages’, although ‘Read and Write’ would be fine. Click ‘Update settings’ (If you didn’t add your mobile number to your account earlier, you;ll get an error).
Now click ‘API Keys’

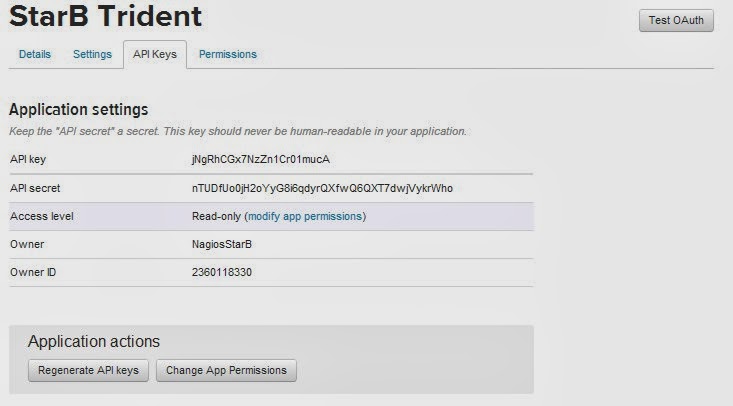
You need to copy the API key and API secret (Please dont try to use mine).
Now click ‘create my access token’ close to the bottom of the page.

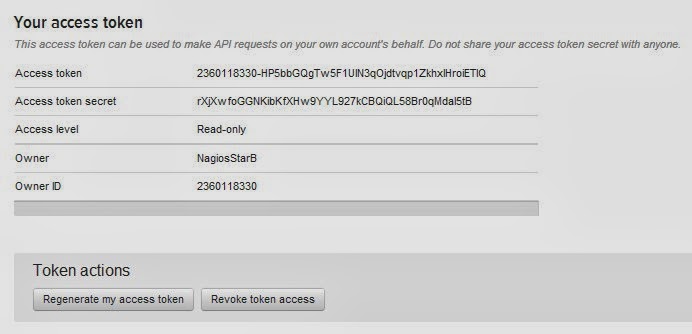
You also need to copy your ‘Access token’ and ‘Access tocken secret’

Now we move onto the notification script.
Login to your Nagios server via SSH.
You need to ensure you have python-dev & python-pip installed.

apt-get install python-dev python-pip
pip install tweepy

Then cd into your nagios libexec folder (mines at /usr/local/nagios/libexec)

cd /usr/local/nagios/libexec/

We now add a new file called twitternagiosstatus.py

nano -w twitternagiosstatus.py

Copy and paste the following code into the file

#!/usr/bin/env python2.7
# tweet.py by Alex Eames http://raspi.tv/?p=5908
import tweepy
import sys
import logging

# Setup Debug Logging
logging.basicConfig(filename='/tmp/twitternagios.log',level=logging.DEBUG)
logging.debug('Starting Debug Log')

# Consumer keys and access tokens, used for OAuth
consumer_key = 'jNgRhCGx7NzZn1Cr01mucA'
consumer_secret = 'nTUDfUo0jH2oYyG8i6qdyrQXfwQ6QXT7dwjVykrWho'
access_token = '2360118330-HP5bbGQgTw5F1UIN3qOjdtvqp1ZkhxlHroiETIQ'
access_token_secret = 'rXjXwfoGGNKibKfXHw9YYL927kCBQiQL58Br0qMdaI5tB'

# OAuth process, using the keys and tokens
auth = tweepy.OAuthHandler(consumer_key, consumer_secret)
auth.set_access_token(access_token, access_token_secret)

# Creation of the actual interface, using authentication
api = tweepy.API(auth)

if len(sys.argv) >= 2:
    tweet_text = sys.argv[1]
    logging.debug('Argument #1 ' + tweet_text)

    if len(tweet_text) <= 140:
        logging.debug('Tweeting: ' + tweet_text)
        api.update_status(tweet_text)
    else:
        print "tweet sent truncated. Too long. 140 chars Max."
        logging.debug('Too Long. Tweet sent truncated.')
        api.update_status(tweet_text[0:140])

Replace consumer_key with your API key, consumer_secret with your API secret, access_token with your access token and access_token_secret with your Access token secret.
Now save and exit the editor.

CTRL+x then Y then Enter.

With the file saved, we need to make it executable.

chmod +x twitternagiosstatus.py

You can now test that the script works by typing

./twitternagiosstatus.py "testy testy"

You should now be able to see the Tweet on your new account (you may need to refresh the page).
If all has gone well so far, you can now add your Nagios Configuration.
Change Directory into your nagios etc

cd /usr/local/nagios/etc/

Edit your commands.cfg (mine is inside objects)

nano -w objects/commands.cfg

Where you choose to place the new configurations doesn’t really matter, but to keep things in order I choose just below the email commands.
Copy and paste the following

# 'notify-host-by-twitter' command definition
define command{
        command_name    notify-host-by-twitter
        command_line    /usr/local/nagios/libexec/twitternagiosstatus.py "$NOTIFICATIONTYPE$: $HOSTALIAS$ is $HOSTSTATE$"
}

# 'notify-service-by-twitter' command definition
define command{
        command_name    notify-service-by-twitter
        command_line    /usr/local/nagios/libexec/twitternagiosstatus.py "$NOTIFICATIONTYPE$: $SERVICEDESC$ ON $HOSTALIAS$ is $SERVICESTATE$"
}

You can adjust the specifics, but adding other $$ arguments (Use the email notification commands as an example). Save and exit

CTRL+x, then Y, then ENTER

Now we add a new contact. Edit contacts.cfg

nano -w objects/contacts.cfg

Copy and Paste the following

define contact{
        contact_name                    nagios-twitter
        alias                           Nagios Twitter

        service_notification_period     24x7
        host_notification_period        24x7
        service_notification_options    w,u,c,r,f
        host_notification_options       d,u,r,f,s
        service_notification_commands   notify-service-by-twitter
        host_notification_commands      notify-host-by-twitter
        }

define contactgroup{
        contactgroup_name       nagiostwitter
        alias                   Nagios Twitter Notifications
        members                 nagios-twitter
        }

I decided to create a specific contact and contact-group for this, but you can adjust as you wish, add the contact to other contact-groups if you wish.
Now the last bit,
Add the new contact group to the hosts & services, templates or host-groups and service-groups.
How you decide to do this will depend on how you’ve set out your hosts, services, templates and contacts. For me I edit the each of the host files and add contact_groups  nagiostwitter to each host and service.
(IMPORTANT: this will override settings that are inherited from templates, so if you already have email notifications active you’ll either have to just add nagiostwitter to the template or add users to this). Dont forgot to , delimited
An example host of mine

define host{
        use                     linux-server            ; Name of host template$
                                                        ; This host definition $
                                                        ; in (or inherited by) $
        host_name               excalibur
        alias                   Excalibur
        address                 192.168.1.27
        parents                 switch-netgear8
        hostgroups              linux-servers
        statusmap_image         linux40.gd2
        contact_groups          nagiostwitter,sysadm
        }

An example service on this host

define service{
        use                             generic-service         ; Name of servi$
        host_name                       excalibur
        service_description             PING
        check_command                   check_ping!100.0,20%!500.0,60%
        contact_groups                  nagiostwitter,sysadm
        }

That’s it, hopefully if all’s done right you can restart the nagios service.

/etc/init.d/nagios restart

Now your twitter feed will start to be populated with each alert. I can’t emphasis enough that if the nagios configuration is done wrong you may break other alerts that are already setup.
I really need to thank http://raspi.tv/2013/how-to-create-a-twitter-app-on-the-raspberry-pi-with-python-tweepy-part-1#install here as I used this as a starting point.

UPDATE:
A few weeks ago I received an email from twitter telling me my application had been blocked for write operations. It also said to check the Twitter API Terms of Service. I didn’t think this would cause a problem, I’m not spamming anyone other than myself or users I’ve asked to follow the alerts. So I read the Terms of Service, and it’s all fine. I raised a support request with Twitter and had a very quick response saying “Twitter has automated systems that find and disable abusive API keys in bulk. Unfortunately, it looks like your application got caught up in one of these spam groups by mistake. We have reactivated the API key and we apologize for the inconvenience.”
This did stop my alerts for a few days though.So just be aware of this.

UPDATE 2:
Thanks to a comment from Claudio to truncate messages over 140 characters. I’ve incorporated this recommendation into the code above.

Raspberry PI + RTorrent +Apache2 + RUTorrent

I’ve been using one of my PI’s as a torrent server for some time. Recently I decided to refresh the entire system. This will NOT go into the legalities of downloading anything, I expect everyone to only be using this for downloading raspberry images 🙂

Version Info:
2014-01-07-wheezy-raspbian.img
libtorrent 0.13.2
rtorrent 0.9.2
rutorrent 3.6

I’m going to assume you can SSH to your PI, and recommend you get all the latest updates before you start. I’m also going to be naughty and be running all the commands as root.
sudo su –

Then we’ll get the stuff needed to compile rtorrent and a few things needed for the plugins

apt-get install subversion build-essential automake libtool libcppunit-dev libcurl3-dev libsigc++-2.0-dev libxmlrpc-c-dev unzip unrar-free curl libncurses-dev apache2 php5 php5-cli php5-curl libapache2-mod-scgi mediainfo ffmpeg screen

While your waiting may as well get a coffee. With that all finished we’re going to grab the rtorrent packages.

mkdir /root/rtorrent
cd /root/rtorrent

wget http://libtorrent.rakshasa.no/downloads/libtorrent-0.13.2.tar.gz
wget http://libtorrent.rakshasa.no/downloads/rtorrent-0.9.2.tar.gz
wget http://dl.bintray.com/novik65/generic/rutorrent-3.6.tar.gz
wget http://dl.bintray.com/novik65/generic/plugins-3.6.tar.gz

tar xvf libtorrent-0.13.2.tar.gz
tar xvf rtorrent-0.9.2.tar.gz
tar xvf rutorrent-3.6.tar.gz
tar xvf plugins-3.6.tar.gz

Now that you’ve got everything extracted it’s time to compile and install libtorrent

cd /root/rtorrent/libtorrent-0.13.2
./autogen.sh
./configure
make
make install

With libtorrent installed it’s time to compile and install rtorrent

cd /root/rtorrent/rtorrent-0.9.2
./autogen.sh
./configure --with-xmlrpc-c
make
make install
ldconfig

Once you’ve reached this bit, we’re finished with the hanging around. We’ll now install rutorrent and it’s plugins

cd /root/rtorrent
rm /var/www/index.html
cp -r rutorrent/* /var/www/
cp -r plugins/* /var/www/plugins
chown -R www-data:www-data /var/www
a2enmod scgi
service apache2 restart

We’ll next create a new user account for rtorrent to run as

adduser -m -r rtorrent

Now we switch to the new user account to add the required rtorrent directories and config

su rtorrent
mkdir .sessions
mkdir complete
mkdir torrents
mkdir watch
nano -w .rtorrent.rc

Copy and Paste the following:-

# This is an example resource file for rTorrent. Copy to
# ~/.rtorrent.rc and enable/modify the options as needed. Remember to
# uncomment the options you wish to enable.

# Maximum and minimum number of peers to connect to per torrent.
#min_peers = 40
#max_peers = 100

# Same as above but for seeding completed torrents (-1 = same as downloading)
#min_peers_seed = 10
#max_peers_seed = 50

# Maximum number of simultanious uploads per torrent.
#max_uploads = 15

# Global upload and download rate in KiB. "0" for unlimited.
download_rate = 0
upload_rate = 100

# Default directory to save the downloaded torrents.
directory = ~/torrents

# Default session directory. Make sure you don't run multiple instance
# of rtorrent using the same session directory. Perhaps using a
# relative path?
session = ~/.sessions

# Watch a directory for new torrents, and stop those that have been
# deleted.
schedule = watch_directory,5,5,load_start=~/watch/*.torrent
schedule = untied_directory,5,5,stop_untied=~/watch/*.torrent

# Close torrents when diskspace is low.
schedule = low_diskspace,5,10,close_low_diskspace=200M

# Stop torrents when reaching upload ratio in percent,
# when also reaching total upload in bytes, or when
# reaching final upload ratio in percent.
# example: stop at ratio 2.0 with at least 200 MB uploaded, or else ratio 20.0
#schedule = ratio,60,60,"stop_on_ratio=200,200M,2000"
#schedule = ratio,5,5,"stop_on_ratio=1,1M,10"
ratio.enable=
ratio.min.set=1
ratio.max.set=2
ratio.upload.set=1K
system.method.set = group.seeding.ratio.command, d.close=, d.stop=

# Set Schedules
#schedule = throttle_1,00:10:00,24:00:00,download_rate=0
#schedule = throttle_2,07:50:00,24:00:00,download_rate=200

# Stop Seeding When complete
#system.method.set_key = event.download.finished,1close_seeding,d.close=
#system.method.set_key = event.download.finished,2stop_seeding,d.stop=

# The ip address reported to the tracker.
#ip = 127.0.0.1
#ip = rakshasa.no

# The ip address the listening socket and outgoing connections is
# bound to.
##bind = 127.0.0.1
#bind = rakshasa.no

# Port range to use for listening.
port_range = 51515-51520

# Start opening ports at a random position within the port range.
#port_random = no

# Check hash for finished torrents. Might be usefull until the bug is
# fixed that causes lack of diskspace not to be properly reported.
#check_hash = no

# Set whetever the client should try to connect to UDP trackers.
use_udp_trackers = yes

# Alternative calls to bind and ip that should handle dynamic ip's.
#schedule = ip_tick,0,1800,ip=rakshasa
#schedule = bind_tick,0,1800,bind=rakshasa

# Encryption options, set to none (default) or any combination of the following:
# allow_incoming, try_outgoing, require, require_RC4, enable_retry, prefer_plaintext
#
# The example value allows incoming encrypted connections, starts unencrypted
# outgoing connections but retries with encryption if they fail, preferring
# plaintext to RC4 encryption after the encrypted handshake
#
# encryption = allow_incoming,enable_retry,prefer_plaintext
#encryption = allow_incomming,try_outgoing

# Enable DHT support for trackerless torrents or when all trackers are down.
# May be set to "disable" (completely disable DHT), "off" (do not start DHT),
# "auto" (start and stop DHT as needed), or "on" (start DHT immediately).
# The default is "off". For DHT to work, a session directory must be defined.
#
# dht = auto
dht = off

# UDP port to use for DHT.
#
# dht_port = 6881

# Enable peer exchange (for torrents not marked private)
#
# peer_exchange = yes
peer_exchange = no

#
# Do not modify the following parameters unless you know what you're doing.
#

# Hash read-ahead controls how many MB to request the kernel to read
# ahead. If the value is too low the disk may not be fully utilized,
# while if too high the kernel might not be able to keep the read
# pages in memory thus end up trashing.
#hash_read_ahead = 10

# Interval between attempts to check the hash, in milliseconds.
#hash_interval = 100

# Number of attempts to check the hash while using the mincore status,
# before forcing. Overworked systems might need lower values to get a
# decent hash checking rate.
#hash_max_tries = 10

#Added for rutorrent stuff
encoding_list = UTF-8
#scgi_local = /tmp/rpc.socket
#schedule = chmod,0,0,"execute=chmod,777,/tmp/rpc.socket"
scgi_port = localhost:5000

# Start The Plugins when Rtorrent Starts not when the page is first opened. If apache service is restart separately the plugins are likely to be stopped. Only really needed for RSS feeds.
execute = {sh,-c,/usr/bin/php /var/www/php/initplugins.php &}

Save and Exit (ctrl+x then y then enter)
We now need to perform a test run of rtorrent.

rtorrent

It should start without any problems. You may get a few warnings inside rtorrent, but it should still be running. To Exit press ctrl+q.
You should now exit the rtorrent user.

exit

Finally we’re going to setup rtorrent to automatically start when the PI is powered up.

nano -w /etc/init.d/rtorrent

Copy and Paste the Following:-

#!/bin/bash

# To start the script automatically at bootup type the following command
# update-rc.d torrent defaults 99

RTUSER=rtorrent
TORRENT=/usr/local/bin/rtorrent

case $1 in
start)
#display to user that what is being started
echo "Starting rtorrent..."
sleep 4
#start the process and record record it's pid
rm /home/rtorrent/.sessions/rtorrent.lock
start-stop-daemon --start --background --pidfile /var/run/rtorrent.pid --make-pidfile --exec /bin/su -- -c "/usr/bin/screen -dmUS torrent $TORRENT" $RTUSER
## start-stop-daemon --start --background --exec /usr/bin/screen -- -dmUS torrent $TORRENT
#output failure or success
#info on how to interact with the torrent
echo "To interact with the torrent client, you will need to reattach the screen session with following command"
echo "screen -r torrent"
if [[ $? -eq 0 ]]; then
echo "The process started successfully"
else
echo "The process failed to start"
fi
;;

stop)
#display that we are stopping the process
echo "Stopping rtorrent"
#stop the process using pid from start()
start-stop-daemon --stop --name rtorrent
#output success or failure
if [[ $? -eq 0 ]]; then
echo "The process stopped successfully"
else
echo "The process failed to stop"
fi
;;

*)
# show the options
echo "Usage: {start|stop}"
;;
esac

Save and Exit (ctrl+x then y then enter)
Then run


chmod +x /etc/init.d/rtorrent

update-rc.d rtorrent defaults

And that’s it. You could now start rtorrent using “/etc/init.d/rtorrent start”, but it’s just as easy to reboot and test that the startup scripts runs. Once you’ve reboot or started rtorrent you can access the webpage at http://{ip-address or name} Notes:-

This setup is meant to run internally, as such there is no security on the apache setup.

Personally I forward ports 51515-51520 on the router onto the PI, this makes a difference in download speed (much quicker) but as it's opening ports it's a security risk so you'll have to decided whether or not to.

I run this setup behind a vpn using ipredator.se, if there's any demand I'll write up another guide on how to configure that and ensure your traffic is locked to only go over the vpn.

Raspberry PI – LDAP Auth

Using Rasbian 20-12-2013 with updates

Install libnss-ldap

apt-get install libnss-ldap

Once complete you’ll be prompted for ldap details

ldap server e.g ldap://192.168.1.3/ ldap://192.168.1.2/
base dn e.g dc=system,dc=local
ldap version e.g 3
Does LDAP require login e.g No
Special LDAP privileges for Root e.g No

Once you’ve given the ldap details you need to update nsswitch.conf

nano -w /etc/nsswitch.conf

Previous config:

passwd:         compat
group:          compat
shadow:         compat

hosts:          files dns

networks:       files

protocols:      db files
services:       db files
ethers:         db files
rpc:            db files

netgroup:       nis

New config:

#passwd:         compat
passwd:         files ldap
#group:          compat
group:          files ldap
#shadow:         compat
shadow:         files ldap

hosts:          files dns

networks:       files

protocols:      db files
services:       db files
ethers:         db files
rpc:            db files

netgroup:       nis

Then we add the following so that home directories are automatically created

nano -w /usr/share/pam-configs/my_mkhomedir
Name: activate mkhomedir

Default: yes
Priority: 900
Session-Type: Additional
Session:
required                        pam_mkhomedir.so umask=0022 skel=/etc/skel

Apply the above using

pam-auth-update

To make sure everything is applied and the cache daemon doesn’t screw about I reboot. Once reboot login worked fine. A few commands that can help see what’s happening

getent passwd
getent group
tail /var/log/auth.log

otrs forbidden installer.pl or index.pl

Currently moving an OTRS installation from one server to another. This installation has been running fine for months, I’ll be upgrading as part of the process from 3.2.6 to 3.3.1 but to keep the migration simple I thought I’d just tar up the current OTRS installation and dump the database. Copy them over to the new server extract the files and restore the database and permissions.
This all went well, so I configured apache (copied the existing apache config from the old server). Restart the apache server and tried accessing the page. Kept getting ‘Forbidden’ messages, everything pointing towards permissions, so checked and reran otrs.SetPermissions still no joy. As nothing seemed to be moving forward I decided to wipe the install, and perform a fresh install. Did this but then found that apache just wouldn’t start. This was down to alot of entries in various failes pointing to /opt/otrs/ rather than my installed /usr/local/otrs/ Once I sorted this I was back to encountering ‘Forbidden’ messages again.
After alot of poking around and searching the net I found:-
http://httpd.apache.org/docs/2.4/upgrading.html
I hadn’t considered that apache may have been different between servers, a quick ‘apache2 -v’ on each server confirmed one server running 2.2 and the new running 2.4.

So to solve this I had to replace:-
        Order allow,deny
        Allow from all

with

        Require all granted

all through the apache config. After a service apache2 restart this let me get to the installer.pl so with that working, I’ll be back to extracting the OTRS and database from the old server.
I’ll apologise for any mistypes, I’ve written all this from memory, while having a well deserved coffee.
Old system was running Ubuntu 12.04 new is 13.10?

Raspberry Pi Scanner using HP PSC 2170

A few days ago I decided to have a good sort of all my old documents, statements and piles of paper that I’ve kept for years just incase I need it (I doubt I’m ever going to need my mobile phone statement from 2008).
I’ve been looking on ebay for a few months for a networked duplex document scanner. but these seem to easy break £70 and I don’t think I’d get alot of use out of it beyond initially scanning everything.
I already have a HP PSC 2170 Printer/scanner (not duplex), but the windows software is pretty crap, I use irfanview (which is a great bit of software), but the HP scanning software insists on loading for each scan then warmup the lamp and do a prescan before allowing me to actually scan. It’s always put me off using it.

So while thinking I’ve got papers everywhere, a scanner, and a few free PI’s a little light went off in my head, surely I can use a PI (I’m not expecting wonders with the scanner) but it’s something to play with. So google being your friend I went looking and came across:-
http://eduardoluis.com/raspberry-pi-and-usb-network-scanner/

ok so I could just take what he’s done and just use it. It looks like a good idea, and he/she has updated the process to include some form of web interface. Anyway it’s not what I need I just want to be able to scan to a device that’s on my network.

I put a rasbian image onto the PI, expanded the 16Gb SD card, named the PI and run updates.
Then I installed ‘sane’ via ‘apt-get install sane’
{note this is from memory, my history doesn’t contain all the commands I’ve used, I’ll need to recheck this on a fresh install}
Once sane was installed I used ‘scanimage -L’ to check my device is being detected. Nope nothing get’s listed. A quick google search for ‘sane HP PSC 2170’ I found a page listing HP PSC 2170 as good support. so I thought, well it should just be working. after a bit of scrolling around I noticed the table had an end column listing driver as hpaio, this wasn’t apparent against my printer, nevermind it’s another clue. So a bit more poking around to find out if the driver is installed I found ‘apt-get install libsane-hpaio’. Now when running ‘scanimage -L’ I get device `hpaio:/usb/PSC_2170_Series?serial=XXXXXXXXX’ is a Hewlett-Packard PSC_2170_Series all-in-one’.

With all this up and running I’m now onto getting an image. Running ‘scanimage -p –format=tiff –resolution=150 > test.tiff’ gives me a nice image within a few seconds. I was surprised at just just how quick the scanner sprang into action. No scanning the same piece of paper twice, no warming up the lamp.

Now that I have this, I’d much rather a jpg than a tiff. so I use ‘convert temp.pnm temp.jpg’ oh look another error, convert isn’t a valid command. Of course it’s not, I forgot to install anything. ‘apt-get install imagemagick’ and rerun the convert and now I have a much smaller jpg file. (I’m going to skip the steps I used to install and configure samba, to be able to pickup my images, but take it I did. I could have just as easily used WinSCP to access the files)

With all the tests done, and alot of {press up, press enter} I decided to write a quick bas script. First to just capture an image then convert it using a filename provided, then I improved it to save the filename based on the unix time, next I improved it to be able to group multiple pages into a single folder. Below is the script that when run, gives an option of single scan page or multi scan page, goes off and runs the scan and convert and returns either to the initial prompt or in multimode ask if there’s another page.

cat /usr/sbin/scan_it.sh
#!/bin/bash
scan()
{
image_date=`date +%s`
pwd=`pwd`
echo "  :  Scanning Image $image_date into $pwd"
scanimage --resolution=200 > temp.pnm
convert temp.pnm $image_date.jpg
rm temp.pnm
}
while [ true ]
do
  read -n 1 -p "Single, Multiple, Quit? " INPUT
  case "$INPUT" in
  s)
    cd /var/scans/
    scan
    ;;
  m)
    folder_date=`date +%s`
    mkdir /var/scans/$folder_date
    cd /var/scans/$folder_date
    YN=y
    while [ "$YN" == "y" ]
    do
      scan
      echo "Another Page? (Y/N) "
      read -n 1 YN
    done
    ;;
  q)
    echo " Quitting... Goodbye..."
    exit 0
    ;;
  *)
    echo " Not an Option! "
    ;;
  esac
done
This script presumes you have already made a folder ‘/var/scans’ using ‘mkdir /var/scans’
I did also setup sane to run as a network service making the scanner available from other machines, but I haven’t tested this yet. For my needs I decided to keep the images as jpgs rather than make PDF’s I still may make PDF’s out of all my documents, especially the multi paged ones. But I like the idea that I can access jpg’s on pretty much anything (including my recent experiments with python and pygame to display graphics on my TV via HDMI. I think PDF’s are a little more restrictive).
When doing the initial google search I also came across:-
Which looks like a really promising idea. To move away from needing terminal access to the PI to scan stuff.
The main reason I’ve decided not to go any further at the moment, is my printer/scanner I think is starting to die (not related to this setup) on a few occasions it’s refused to scan and needed a reboot, it’s also locked the scanner at the bottom of the page instead of returning after a scan, and went through alot of clunking (which just wouldn’t stop) when it was initializing after one reboot.
While it has the possibility of failing to complete a scan I’d rather be able to see any errors on screen.
I’ve spent tonight scanning over 400 pages, at the end of which I copied all the files to my server and run a backup then happily set fire to each piece of paper I’ve been keeping for years. It’s been something of a therapeutic exercise. I have no doubt I’ll be returning to this little project in time to actually incorporate sending the files directly to the server, having the option to email them, converting to PDF on request, and god knows whatelse. For the time being this script is doing me just fine. The only option I may incorporate is a selection of a ‘scan to’ folder before selecting single/multiple after scanning alot of bank statements, phone statements, payslips, etc I know I’m going to be sorting them all into subfolders and doing this at the time of scan just makes more sense.
Anyway that’s my rambling for today. Hopefully it will give someone some ideas.

Ubuntu LDAP Authentication (You are required to change your password immediately (password aged)) Part 2

In an earlier post I was encountering password problems when authenticating via OpenLDAP. This was prompting me to change my password while login onto certain servers but not all. The change prompt would then disappear after typing the current password and close the putty session.

Having resolved that particular problem I’m left with another. Although the password change is successful I now have to change the password on each login.

When I encountered the first problem a few months back I thought it was to do with the LDAP ACL. I think I was partly right as this is a continuation of that problem and it does look like this will be ACL related.

So looking at what information I can pull together, looking at the shadow information:-

root@Exxxxxxxx:~# getent shadow
root:*:::45::::
nobody:*:::::::
{username}:*:::365:::16177:

Using slapcat to pull all the information off ldap below are the relevant bits:-

shadowMax: 365
shadowExpire: 16177
shadowLastChange: 15921

So it looks like the shadowLastChange isn’t allowed to be viewed. I found someone else recommending that you make shadowLastChange readable by all. Below is the current ACL:-

dn: olcDatabase={1}hdb,cn=config
olcAccess: {0}to attrs=userPassword,shadowLastChange by self write by anonymous auth by dn=”cn=admin,dc=domain,dc=local” write by * none
olcAccess: {1}to dn.base=”” by * read
olcAccess: {2}to * by self write by dn=”cn=admin,dc=domain,dc=local” write by * read

And here is the configuration that supposed to work (I say supposed to as I’m writing this while doing):-

dn: olcDatabase={1}hdb,cn=config
olcAccess: {0}to attrs=userPassword by self write by anonymous auth by dn=”cn=admin,dc=domain,dc=local” write by * none
olcAccess: {1}to attrs=shadowLastChange by self write by dn=”cn=admin,dc=domain,dc=local” write by * read
olcAccess: {2}to dn.base=”” by * read
olcAccess: {3}to * by self write by dn=”cn=admin,dc=domain,dc=local” write by * read

I’m not going to address any security concerns on making this field readable, for me it’s minimal.
So how do I change the ACL from the 1st to the 2nd. Make a new text file:-

nano -w auth_new.ldif
dn: olcDatabase={1}hdb,cn=config
changetype: modify
replace: olcAccess
olcAccess: {0}to attrs=userPassword by self write by anonymous auth by dn="cn=admin,dc=domain,dc=local" write by * none
olcAccess: {1}to attrs=shadowLastChange by self write by dn="cn=admin,dc=domain,dc=local" write by * read
olcAccess: {2}to dn.base="" by * read
olcAccess: {3}to * by self write by dn="cn=admin,dc=domain,dc=local" write by * read

Make sure to change the dn to your specific setup. Failure to do so may result in you loosing admin access. Useful command:-

ldapsearch -Q -LLL -Y EXTERNAL -H ldapi:/// -b cn=config '(olcAccess=*)' olcAccess
Next you modify the ldap using:-

ldapmodify -Q -Y EXTERNAL -H ldapi:/// -f auth_new.ldif

Now when I checkout the shadow information I get:-

root@Exxxxxxxx:~/ldap# getent shadow
root:*:15797::45::::
nobody:*:::::::
{username}:*:15921::365:::16177:

Now when I login I’m not being prompted to change my password. I’m not entirely sure if this is right or wrong anymore as I’ve been changing my password all night, so I guess I’ll just wait for a few user accounts to expire and check that it does all work.

Update: It does work. I tested it with a users account that was having problems login into one of the servers, they were still prompted for their ldap password and told they must change it. Did that and then closed putty and tried again, logged in with the new password and wasn’t reprompted to change it again.

Ubuntu LDAP Authentication (You are required to change your password immediately (password aged))

Been hitting a problem on one of my servers for a while, when trying to login users keep getting prompted to change their password but it just closes putty after they retype their password.

I thought I narrowed it down to an ldap option roobinddn, I use this on some of my servers (those I consider secure) For the servers that I dont have the rootbinddn setup for, they receive the password change prompt for those that have it set they just allow login.
I looked at it a few months back but never had the time to really investigate and resolve it. I thought it had something to do with the ldap ACL permissions that the user doesn’t have access to the password fields for their own account. However looking at it today I think I may be only partly correct.

If I run login {username} I get the below:-

root@Exxxxxxxxx:~# login {username}
Password:
You are required to change your password immediately (password aged)
Enter login(LDAP) password:

Authentication information cannot be recovered

 I haven’t seen the ‘Authentication information cannot be recovered’ before as putty always closes. Checking out this error (I google every error) I found the solution was installing libpam-cracklib:-

apt-get install libpam-cracklib 

So now when I run login {username} I get:-

root@Exxxxxxxxx:~# login {username}
Password:
You are required to change your password immediately (password aged)
Enter login(LDAP) password:
New password:
Retype new password:
LDAP password information changed for {usernae}
Last login: Sun Aug 4 04:48:45 BST 2013 on pts/1

And a nice bash prompt.
Now onto problem #2, although I can now login after changing the password I get the password change prompt each login. Changing the password does take as login in the 2nd time uses the new password. So I think it’s now down to the ldap ACL for shadowLastChange so I’m going to investigate that, and will put anything to correct that one in another post.

Quagga Automatic Restart/Recovery

As I’m sure I’ve posted before, I use OpenVPN and Quagga to build up my network. After recently updating all my Ubuntu servers something strange happened, quagga that had been pretty rock solid started screwing up. Previously I’ve had the odd problem where a VPN would drop out and somehow block coming back up, so I scripted some VPN checks to confirm each link was up. If not the script restarts the VPN link that’s down. This has been working fine on each server and with quagga running routes around the entire network just keep working. Until of course the recent updates on each system that seem to have introduced a fault with quagga. Although quagga is remains running, all the routes disappear and just wont come back. An error does get logged in one of the logs (I’ll try to find what the error was and update here), but the quagga watchdog doesn’t see a problem since everything is still running. So I’ve put together a little script below that checks the routing table, and if there’s no entries relating to other networks (not local) then it’s considered that quagga has gone faulty and restarts it.

nano -w /usr/sbin/check_quagga_routes.sh
#!/bin/bash
checktime=`date`
echo $checktime : Checking Routing... >> /var/log/connection.info
routing=`route -n | grep -i 255.255.255.0 | grep -vi eth0`
if [ -z "$routing" ]
then
# No Routes to VPNs Detected. Restart Quagga
/etc/init.d/quagga restart
# log the restart
echo $checktime : VPN Routes NOT Detected. Restarting Quagga! >> /var/log/connection.info
fi
echo $checktime : Routing Check Complete. >> /var/log/connection.info
exit 0

The crontab entry is:-

*/1 * * * *   root     /usr/sbin/check_quagga_routes.sh > /dev/null 2>&1

This should mean that I wont have to manually restart quagga again if the fault occurs. Hopefully whatever has happened in the update will be fixed, but there’s no harm in leaving this in place as far as I can see.

Normally I’d opt for Nagios to run a check and on failure run a handler script, but since all the nagios checks and handlers get run across the VPN, as soon as the routes go down nagios is pretty useless. So this has to be run on each of the servers.

Twonky Server Slow Scanning

Ok so first a little about my setup.
I have twonky running on a RaspberryPI along with OpenVPN. The whole point is so that I can play my files when away from home. This worked great a few months ago simply plug in to the internet, the VPN connects and then the shares are connected, and twonky scans the folders. It’s not perfect in that twonky can scan empty folders and remove stuff from it’s database so it kinda screws with the playlists and I can never remember what episode I got upto. But it still works. Then I upgraded to 6.0.39 and things went a little weird. It used to complete a scan within a few minutes. But now it was taking over an hour to complete. For the most part it didn’t really bother me, plug it in and leave it do it’s thing. But if the VPN ever went a bit weird it could cause a full rescan, it also seemed to use more data, previously a few Mb now it could be a few 100Mb.

It was more of an annoyance than anything. I did have a search around but couldn’t find anything that would have caused it in the version changes that jumped out at me.

That is until today.
Today I found an article on Series and Movie thumbnails http://server.vijge.net/tw-video-scraper/ so I grabbed the files. I’m not sure if they work 100% yet, I’m getting a symlink error when I run it manually, but it does pull and save a thumbnail. As I’m watching something I don’t want to restart twonky to test it.
But I noticed in the cgi-bin folder a few other {scripts}, in particular ffmpeg-video-thumb.desc
Now the stuff in the link does say to disable this, but it got me thinking. Is this running on the PI, so I decided to have a look. There’s alot more files in the cgi-bin for 6.0.39 than previous versions, and this will try to make a thumbnail for each video file. So I disabled the code by putting # at the start of each line. It may not be the cleanest approach but I want to be able to put it back if it breaks something.

Restarted twonky on the PI, and watched the status page. It managed to scan everything across the VPN within a few minutes again. And looking at the network stats probably pulled around 10Mb of data.
So I think that’s solved this little problem of slow scanning in Twonky for me.

Asterisk UK Caller ID

I’m sure I’ve got an older post giving details of a patch to get caller ID working. I’d used the same patch for about 5 years over the different versions of Asterisk and it always worked, until recently.

A fresh install on one of the servers, applied the patch and made a bunch of test calls, half caught the Caller ID half missed it. So I worked on it for a while, and could not get it to reliably detect the Caller ID. I posted onto the forums incase anyone else had used the patch nothing.
What made it worse was this server was 1 of 3 running asterisk with a Digum Card on a UK phoneline. the other 2 were still working. So in an effort to eliminate possible causes I ended up installing the same version of asterisk and dahdi that was on each of the other 2 servers in turn and running tests, both with the patch and without. Sometimes it looked better than others catching 8 out of 10 CLI’s but that wasn’t the 10/10 that I was getting on this server before a fresh install of the OS.

After a while I gave up, it wasn’t an important server. I’d only put the asterisk card in to track calls coming into the home line, but it didn’t do anything more than log the Date and CLI. Everything else was done over SIP on this server, so I left it kind of working.
Over time the logs seemed to fill with unknown CLI’s more often.

Anyway onto this month. Earlier in the month I reboot my server remotely, when it didn’t come back online I went to investigate why. It was at this point I was almost in tears. I’d stupidly left an SD card in the server that I was imaging, and the server had boot from it. What made this a really really bad move was the fact the SD card I’d imaged with the Rasberry OS, and it decided to go off and format sda (I presume hard coded) which unfortunately was my HDD NOT the SD Card. To make things worse my OS on this server was encrypted, so little chance of recovering anything at all.
As the server runs alot of different stuff, I had to rebuild it as quickly as I possibly could.
A few days ago I got onto the asterisk installation, so ran through installing Dahdi and Asterisk, and changed the configuration based on memory and copying from the other 2 servers. Then I hit the Caller ID problem, out of 8 test calls 3 CLI’s. Now I know this one was working 100% so it has to be something obvious.
Then I remembered seeing something on the “working” server as I was checking it’s configuration to copy and paste.

nano -w /etc/modprobe.d/dahdi.conf
# You should place any module parameters for your DAHDI modules here
# Example:
#
# options wctdm24xxp latency=6
options wctdm opermode=UK fwringdetect=1 battthresh=4

Not something I would have paid attention to, I only ever remember editing a dahdi.blacklist.conf to stop the card being detected as a NetJet. Anyway I added the above file and contents, then reboot. (It should be noted at this point that I hadn’t applied the patch and was almost about to).
After the reboot I started asterisk and run through test calls. 9 out of 9 calls all CLI detected.

So the following day I went and checked the server I was originally having problems with after a fresh install. That didn’t have the line

options wctdm opermode=UK fwringdetect=1 battthresh=4

Bit it did have the blacklist setup. So I added the above and reboot. 10 test calls later all CLI’s detected.

I’ve no idea where I got the above from, but I must have stumbled upon it as a replacement fixed instead fo the patch I’d been using. I say that because the patch files wasn’t on the server that had this configuration, and I always leave the patch files in root incase I need them again.

So if your having a problem with UK Caller ID it maybe worth adding the above.
For info I’m running:-
Server 3:
dahdi-linux-complete-2.6.0+2.6.0
Asterisk 1.8.6.0

Server 2:
dahdi-linux-complete-2.6.1+2.6.1
Asterisk 1.8.6.0

Server 1:
dahdi-linux-complete-2.6.2+2.6.2
asterisk-11.2.1

Server 1 being the newest install, and Server 2 being the one I left with the problem for months.

Hope this helps someone. As UK Caller ID on Asterisk used to be a huge pain with little support and not something that people seemed to cover because Businesses tend to go SIP, IAX or ISDN eliminating the need to fix missing CLI’s.